About the Swimlane Flowchart Template
When processes span multiple teams, departments, or systems, confusion becomes inevitable. Who handles the customer complaint after sales logs it? Which team approves the budget request before development starts building? These everyday questions slow down work and create frustration across organizations.
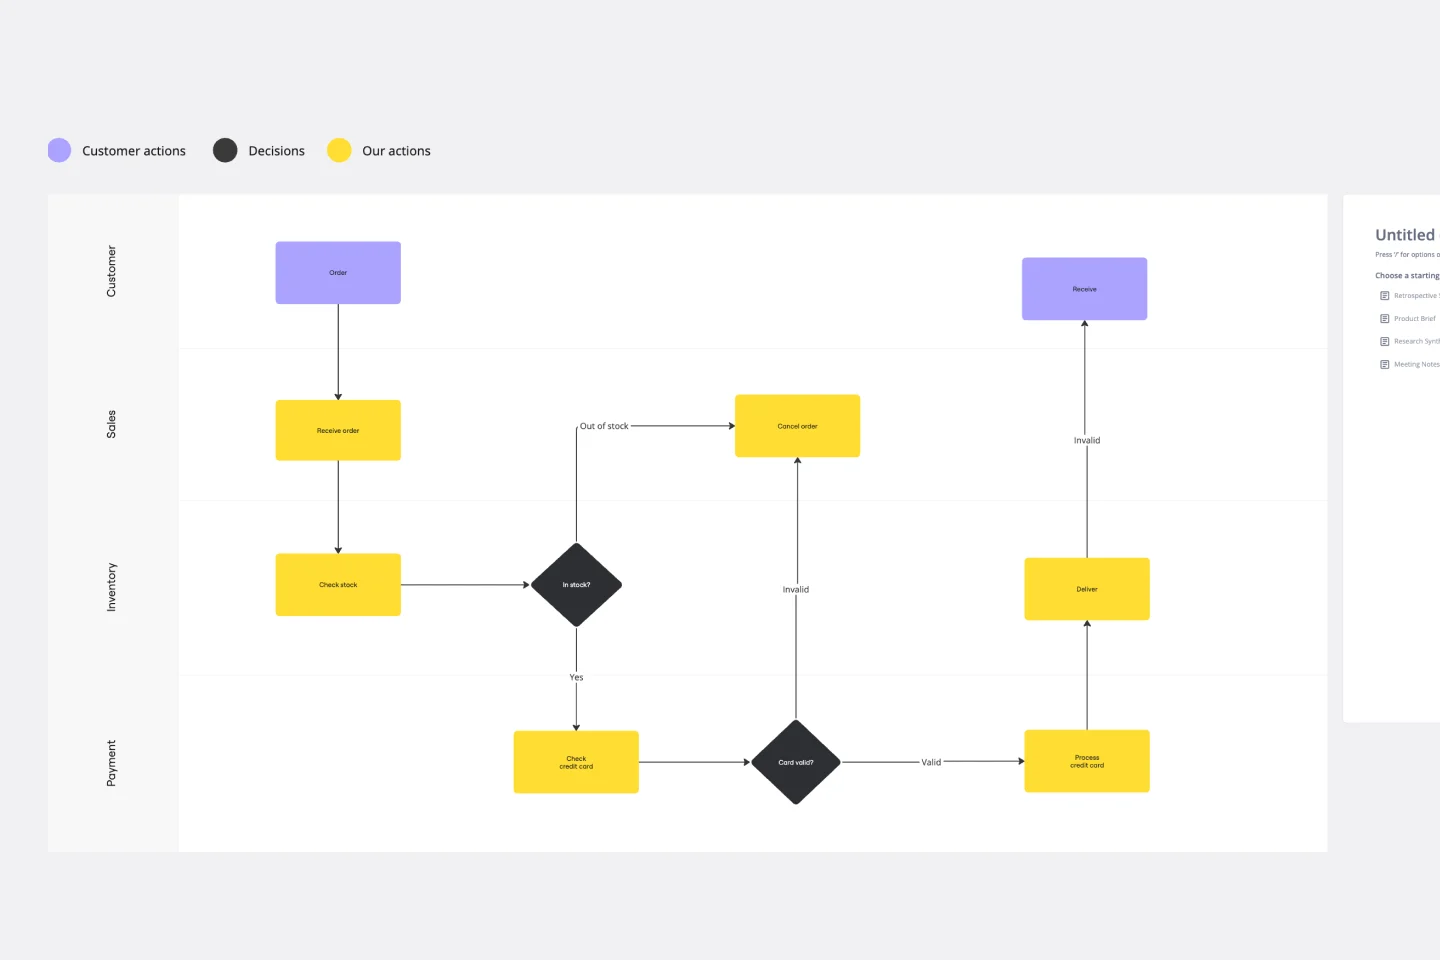
A swimlane flowchart (also known as a cross-functional flowchart) solves this by organizing process steps into distinct "lanes" – each representing a different actor, department, or system. Think of it like a swimming pool with lane dividers: each swimmer stays in their designated area, but everyone can see the whole race.
This visual approach transforms complex multi-department workflows into clear, actionable roadmaps. Instead of lengthy process documents that sit unread in shared drives, you get an intuitive diagram that shows exactly what happens, when it happens, and who makes it happen.
Built with Miro's advanced diagramming capabilities, this template harnesses our robust visual collaboration features to make process mapping both powerful and simple. You're not just creating static diagrams – you're building living documents that teams can update, iterate on, and reference in real-time.
How to use Miro's swimlane flowchart template
Creating effective swimlane flowcharts becomes straightforward when you follow these six steps. Each builds on the previous one, helping you capture the full complexity of your process while maintaining clarity.
1. Define your process scope and outcomes
Start by identifying exactly what process you're mapping and what success looks like. Are you documenting how customer support tickets get resolved? Mapping the product development lifecycle? Visualizing your hiring workflow?
Write down the process name, its start point, and desired end state. This foundation prevents scope creep and keeps your flowchart focused on solving real problems rather than documenting everything that could possibly happen.
2. Identify your key actors and create swimlanes
List every department, role, or system that touches your process. Common actors include specific teams (marketing, engineering, sales), individual roles (project manager, designer, approver), or external systems (CRM, payment processor, inventory management).
Create a horizontal swimlane for each actor using Miro's diagrammatic tools. Position the most active participants at the top – this makes the chart easier to follow since readers naturally scan from top to bottom.
3. Map the process flow step by step
Start with your process trigger and work chronologically through each action. Place each step in the appropriate swimlane based on who performs it. Use Miro's shape library to distinguish between different types of activities:
Rectangles for standard process steps
Diamonds for decision points
Circles for start/end points
Parallelograms for inputs/outputs
Connect these shapes with arrows showing the flow direction. When a step moves from one actor to another, the arrow crosses swimlane boundaries – making handoffs visually obvious.
4. Add decision points and alternate paths
Real processes rarely follow straight lines. Add diamond shapes for decision points where the process could branch in different directions. Label each path clearly (Yes/No, Approved/Rejected, High Priority/Low Priority).
Map out what happens in each scenario, including exception handling and error states. This comprehensive approach prevents teams from getting stuck when edge cases arise.
5. Include timing and additional context
Use Miro's annotation features to add timing estimates, required resources, or important notes directly to relevant steps. This context helps teams understand not just what to do, but how long it should take and what they'll need.
Consider color-coding steps by priority, complexity, or department for additional visual clarity. Miro's robust formatting options make these enhancements simple to implement and maintain.
6. Test and refine with your team
Share your draft flowchart with people who actually perform the work. Use Miro's real-time collaboration features to gather feedback, identify missing steps, and spot potential improvements.
Walk through several real examples using your flowchart as a guide. If team members get confused or the process doesn't match reality, update the diagram immediately. The goal is creating a living document that accurately reflects how work actually gets done.
What should be included in a swimlane flowchart template?
Effective swimlane flowcharts balance comprehensive detail with visual clarity. Include these essential elements while avoiding unnecessary complexity that makes diagrams hard to follow.
Clear swimlane labels
Label each horizontal lane with specific, unambiguous names. "Marketing Team" works better than "Marketing." "Customer Success Manager" is clearer than "CSM." Specific labels prevent confusion about who owns each step.
Process triggers and endpoints
Clearly mark what kicks off the process and what constitutes completion. Use distinctive shapes (often circles) so anyone can quickly identify where processes begin and end.
Decision points with explicit criteria
Every diamond shape should include the specific question being answered. Instead of generic "Approved?" labels, use "Budget under $10K?" or "Customer responds within 48 hours?" This specificity helps teams make consistent decisions.
Handoff indicators
Use arrows crossing swimlane boundaries to show when responsibility transfers between actors. These visual cues highlight critical coordination points where miscommunication often occurs.
Timing and resource information
Add duration estimates, required tools, or prerequisite information near relevant steps. This context helps teams plan capacity and identify potential bottlenecks before they cause delays.
Exception handling paths
Include alternate flows for common edge cases, errors, or exceptions. Real processes need contingency plans, and your flowchart should reflect this complexity while maintaining readability.
Benefits of using swimlane flowcharts
Swimlane flowcharts deliver immediate value by making invisible work visible. Teams gain clarity about complex processes while leadership gets transparency into how work actually flows through the organization.
Eliminate role confusion and finger-pointing. When everyone can see who owns each step, accountability becomes automatic. No more "I thought you were handling that" conversations or projects stalling because nobody took ownership.
Identify bottlenecks and inefficiencies quickly. Visual process maps reveal where work gets stuck, which handoffs create delays, and where steps could be streamlined or eliminated entirely.
Onboard new team members faster. Instead of shadowing colleagues for weeks to understand complex workflows, new hires can reference clear visual documentation that shows exactly how their role fits into larger processes.
Standardize best practices across teams. Once you document the ideal process flow, teams can follow consistent approaches rather than everyone improvising their own variations.
Enable better process improvement. You can't optimize what you can't see clearly. Swimlane flowcharts provide the baseline documentation needed for meaningful process analysis and enhancement.
Built with Miro's innovation workspace, these benefits extend beyond individual diagrams. Real-time collaboration means your entire team can contribute to process documentation, while our AI-powered visual canvas helps you iterate and improve workflows continuously.
Swimlane Flowchart Template FAQs
How is a swimlane flowchart different from a regular flowchart?
Regular flowcharts show the sequence of steps in a process, but swimlane flowcharts add a crucial dimension: ownership. By organizing steps into distinct lanes representing different actors, you can see not just what happens, but who makes it happen. This clarity becomes essential for complex processes involving multiple departments or systems.
When should I use swimlanes versus other process mapping techniques?
Choose swimlane flowcharts when your process involves multiple actors, departments, or systems where handoffs and role clarity matter. They're perfect for cross-functional workflows, customer journey mapping, or any situation where "who does what" questions create confusion. For simple single-actor processes, standard flowcharts might be sufficient.
How many swimlanes should I include in one diagram?
Focus on clarity over completeness. Most effective swimlane flowcharts use 3-7 lanes. If you need more, consider breaking complex processes into multiple connected diagrams or grouping related actors into broader categories. Miro's advanced diagramming capabilities make it easy to link related flowcharts together.
Can I use swimlane flowcharts for both high-level and detailed processes?
Absolutely. Start with high-level swimlanes showing major process phases, then create detailed versions for specific steps that need more granular documentation. Miro's flexible canvas lets you zoom in and out of different detail levels as needed, supporting both strategic overview and operational precision.
How do I keep swimlane flowcharts updated as processes change?
Treat your flowcharts as living documents rather than one-time deliverables. Schedule regular reviews with process owners, update diagrams when workflows change, and use Miro's collaborative features to crowdsource improvements from people who actually do the work. Consider assigning ownership for maintaining each flowchart to ensure ongoing accuracy. Last update: August 13, 2025

Miro
Your virtual workspace for innovation
Miro is an innovation workspace designed for teams of every size, everywhere, to dream, design, and build the future together. Our mission? To empower these teams to create the next big thing, powered by AI at every step of the way. Over 90 million users around the world rely on Miro to untangle complex ideas, put customer needs first, and deliver products and services faster. All supported by best-in-class security, compliance, and scalability.
Categories
Similar templates
Swimlane Diagram Template
Swimlane Diagram Template
A swimlane diagram shows you which stakeholders are responsible for each area of your critical processes. You can use it to understand current processes or plan new ones.
Swimlane Diagram Template
Swimlane Diagram Template
A swimlane diagram shows you which stakeholders are responsible for each area of your critical processes. You can use it to understand current processes or plan new ones.