Table of contents
Table of contents
Kubernetes Architecture Diagrams: Everything you need to know
Summary
In this guide, you will learn:
Kubernetes architecture and its client-server model
Key control plane components: API server, scheduler, controller manager, etcd
Main software on worker nodes: kubelet, kube-proxy, container runtimes
How Kubernetes manages core objects: pods, deployments, services
Role of networking and security in communication
Best practices for high availability and extensibility with custom resources
Try Miro now
Join thousands of teams using Miro to do their best work yet.
Kubernetes is the rockstar of the container orchestration world, but its architecture can seem like a labyrinth to those who are just starting out. If you’ve ever found yourself scratching your head while looking at a Kubernetes architecture diagram, you’re in the right place. Step by step, we'll show you how Miro's innovation workspace can simplify understanding and creating these diagrams.
Kubernetes architecture explained
To truly grasp Kubernetes architecture, you need to understand its core principles and components. Kubernetes, often abbreviated as K8s, is an open-source platform designed to automate the deployment, scaling, and operation of application containers. It manages containerized applications across multiple hosts, providing basic mechanisms for deployment, maintenance, and scaling of applications.
Kubernetes has become the de facto standard for container orchestration for several reasons:
Scalability: It can manage hundreds or even thousands of containers at scale.
Portability: Kubernetes works across various environments, including on-premises, public, and private clouds.
Efficiency: Automates many aspects of application deployment and management, reducing manual intervention and errors.
High availability: Ensures applications are always running and available, even in the face of hardware or software failures.
But, when should you use Kubernetes architecture?
Kubernetes diagrams are particularly useful when you need:
Microservices architecture: To manage complex applications composed of multiple microservices.
Continuous deployment and integration: For seamless application updates and rollbacks.
Resource optimization: To optimize the use of computing resources across clusters.
Hybrid and multi-cloud environments: To deploy applications consistently across different cloud providers.
Understanding the Kubernetes architecture building blocks
At its heart, Kubernetes is built on a few key components. These components work in harmony to automate the distribution and scheduling of application containers across a cluster. Let’s dive into these building blocks.
Cluster
A Kubernetes cluster is the whole enchilada. It consists of a set of nodes (physical or virtual machines) that run containerized applications. Each cluster has at least one master node and multiple worker nodes. The master node controls and manages the state of the cluster, while worker nodes run the actual applications.
How to use it:
Setting up: Deploy a Kubernetes cluster using cloud services like Google Kubernetes Engine (GKE), Amazon EKS, or on-premises solutions.
Managing: Use kubectl commands to interact with the cluster, deploy applications, and manage resources.
Nodes
Nodes are the worker bees of the cluster. They can be physical machines or VMs and are responsible for running the actual application containers. Each node contains the necessary services to run pods and is managed by the master components.
How to use it:
Adding nodes: Scale your cluster by adding more nodes, either manually or automatically through autoscaling.
Maintaining nodes: Ensure nodes are healthy and communicate with the master node using kubelet.
Pods
A pod is the smallest and simplest Kubernetes object. A pod represents a single instance of a running process in your cluster. Pods can contain one or more containers, which are tightly coupled and share the pod’s resources.
How to use it:
Deploying pods: Define pods in YAML files and deploy them using kubectl apply - f.
Scaling pods: Use replication controllers to ensure the desired number of pod replicas are running.
Services
Services in Kubernetes define a logical set of pods and a policy by which to access them. Think of services as the glue that connects your pods to each other and to the outside world.
How to use it:
Creating services: Define services in YAML and expose pods to external traffic.
Load balancing: Kubernetes services provide load balancing across multiple pods, ensuring high availability.
Kubernetes architecture components: Deep dive into control plane and nodes
To get a clear picture, let’s break down the architecture into its two main parts: the control plane and the nodes.
Master node
The master node is the brain of your Kubernetes cluster. It’s responsible for managing the cluster, coordinating all activities, and maintaining the desired state of the system.
Key components:
API Server: The front door to your cluster, handling all RESTful requests. It processes operations on the cluster resources.
Scheduler: Assigns work to nodes based on resource availability, ensuring pods are scheduled efficiently.
Controller manager: Ensures the cluster is in the desired state by managing various controllers that handle replication, endpoints, and more.
etcd: The cluster’s brain, storing all data related to the cluster state. It is a distributed key-value store used to hold and replicate data across the cluster.
Worker node
Worker nodes are the backbone of your applications, running the actual workload. Each worker node contains:
Kubelet: An agent that ensures containers are running in a pod. It communicates with the master node and executes the instructions received.
Kube-proxy: Handles network communication inside and outside of the cluster, managing the network rules on the nodes.
Container runtime: Runs and manages containers (e.g., Docker). It pulls container images from registries and starts and stops containers.
Pods
A pod is the smallest deployable unit in Kubernetes and can contain one or more containers. Pods share storage, network resources, and a specification for how to run the containers.
Single-container pods: Most common use case, running a single application container.
Multi-container pods: Used for closely related applications that need to share resources or data.
Services
Services in Kubernetes define a logical set of pods and a policy by which to access them. They provide a stable endpoint (IP address) for a set of pods, enabling communication both within the cluster and externally.
ClusterIP: Exposes the service on an internal IP in the cluster, accessible only within the cluster.
NodePort: Exposes the service on each node’s IP at a static port, accessible externally.
LoadBalancer: Exposes the service externally using a cloud provider’s load balancer.
Deployment strategies: rolling updates, blue-green deployments, and more
Kubernetes shines when it comes to deployment strategies. It supports several methods to update applications without downtime, ensuring smooth and reliable releases.
Rolling updates
Rolling updates gradually replace instances of the old version with the new one. This method ensures that there is no downtime as new pods are created, and old pods are terminated in a controlled manner. Here is how you can do it:
Prepare the update: Define the new version of your application in the deployment configuration.
Apply the update: Use kubectl apply - f <deployment.yaml> to initiate the rolling update.
Monitor the update: Keep an eye on the status using kubectl rollout status deployment/<deployment-name>.
Rolling updates are ideal for applications that need to remain available at all times. They allow you to update your application incrementally, reducing the risk of widespread failure.
Blue-green deployments
Blue-green deployments involve running two identical environments: one active (blue) and one idle (green). When it’s time to release a new version, the new version is deployed to the idle environment. After testing, traffic is switched from the old environment to the new one.
How to do it:
Set up environments: Create two environments (blue and green) within your Kubernetes cluster.
Deploy to idle environment: Deploy the new version to the green environment.
Switch traffic: Use a service or a load balancer to switch traffic from blue to green after successful testing.
Blue-green deployments provide a safe way to test new releases in a production-like environment before making them live. They enable zero-downtime updates and quick rollbacks if something goes wrong.
Canary releases
Canary releases gradually roll out a new version to a small subset of users before making it available to everyone. This method allows you to test the new version in production with minimal risk.
How to do it:
Deploy canary version: Deploy the new version alongside the stable version but to a small percentage of users.
Monitor performance: Observe the canary release for any issues or performance problems.
Gradual rollout: If the canary release is successful, gradually increase the user base until the new version is fully deployed.
Canary releases are great for minimizing the risk associated with new releases. They allow you to gather real-world feedback and detect issues early before a full-scale rollout.
Kubernetes architecture best practices
Designing a robust Kubernetes architecture involves following best practices to ensure scalability, reliability, and security.
Namespace usage
Namespaces provide a way to divide cluster resources between multiple users. They help in creating a clear separation of resources, making it easier to manage and secure different environments like development, testing, and production.
Best practice:
Segmentation: Use namespaces to segment and organize your resources logically.
Access control: Implement Role-Based Access Control (RBAC) to limit access to resources within namespaces.
Resource limits
Setting resource requests and limits is crucial to prevent any single application from monopolizing cluster resources. Requests ensure that a container gets a guaranteed amount of resources, while limits prevent it from using more than a specified amount.
Best practice:
Define requests and limits: Set resource requests and limits for all containers to ensure fair resource distribution.
Monitor resource usage: Continuously monitor resource usage and adjust requests and limits as needed.
Monitoring and logging
Implement comprehensive monitoring and logging to keep an eye on your cluster’s health. Tools like Prometheus, Grafana, and ELK stack are commonly used for monitoring and logging in Kubernetes environments.
Best practice:
Centralized logging: Set up centralized logging to collect and analyze logs from all containers and nodes.
Health checks: Implement health checks for pods to ensure they are running as expected.
Network policies
Secure your cluster with network policies that control communication between pods. Network policies are rules that define how pods communicate with each other and with other network endpoints.
Best practice:
Restrict traffic: Use network policies to restrict traffic between different parts of your application.
Isolation: Implement network isolation to ensure that sensitive data and services are protected.
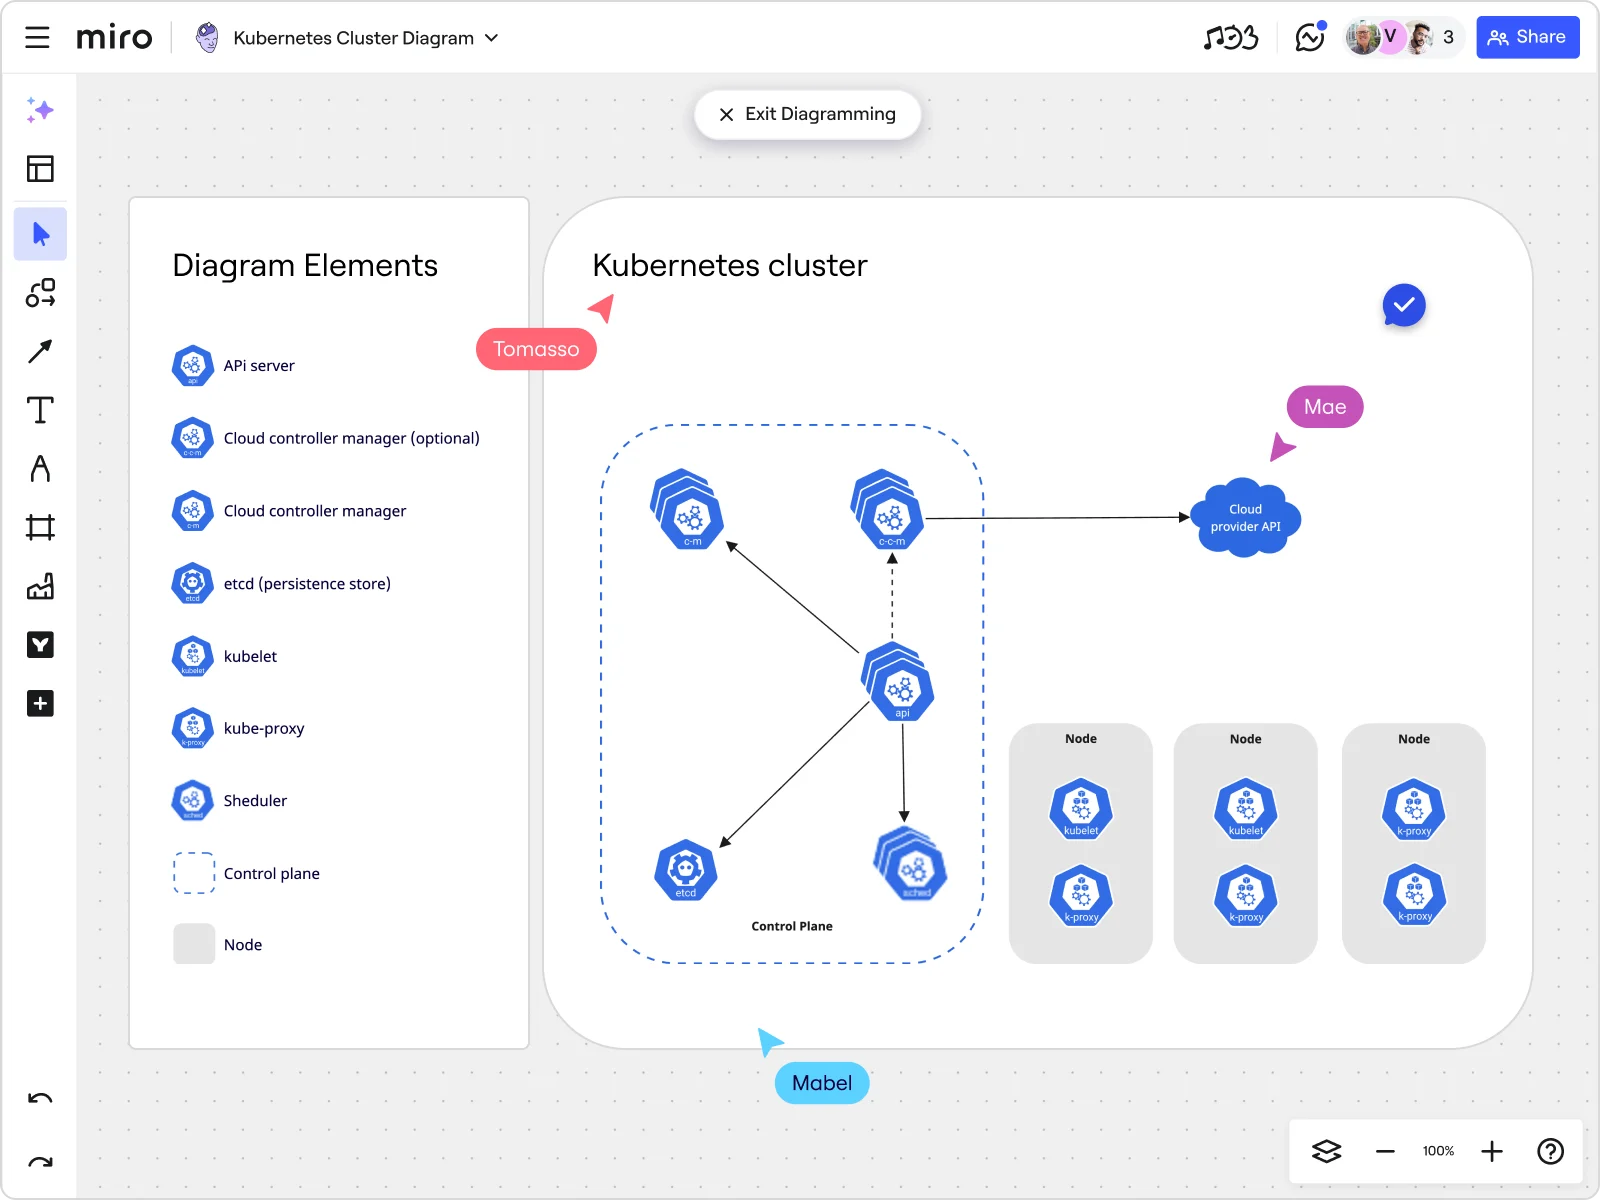
Using Miro to create Kubernetes architecture diagrams
Creating and understanding Kubernetes architecture diagrams becomes significantly easier with Miro's innovation workspace. Here’s how you can leverage Miro for your Kubernetes diagrams:
Kubernetes shapes pack: Miro’s Kubernetes shapes pack offers a variety of pre-designed shapes, making it easy to drag and drop components to build your diagram.
Advanced diagramming: Miro's automated diagramming features streamline the creation process, allowing you to focus on the architecture rather than the drawing.
Miro AI: Leverage Miro AI to automate repetitive tasks and get smart suggestions as you design, making your diagramming process faster and more efficient.
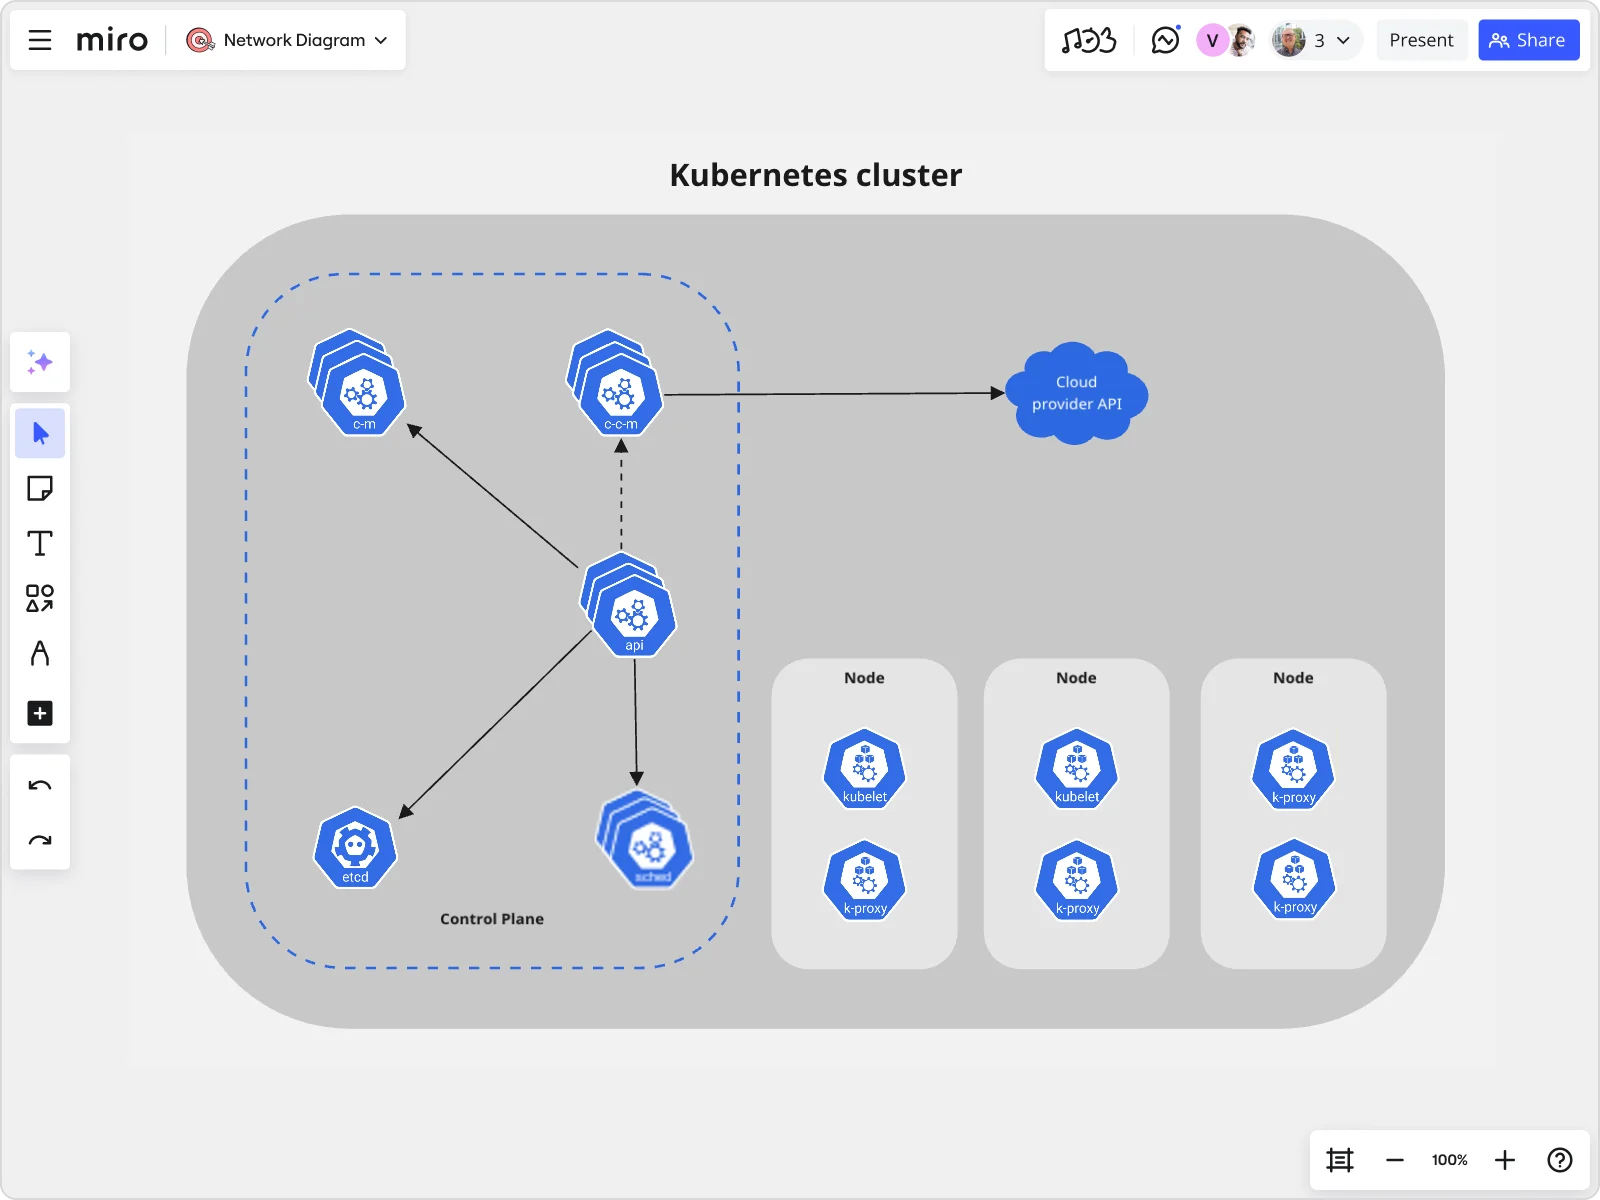
Example: Creating a basic Kubernetes architecture diagram with Miro
Let’s walk through an example of creating a basic Kubernetes architecture diagram in Miro:
Start with the cluster: Use the Kubernetes shapes pack to create a visual representation of your cluster, including the master node and worker nodes.
Add nodes: Drag and drop nodes into your cluster. Use labels and colors to differentiate between master and worker nodes.
Define pods and services: Populate your nodes with pods. Use Miro’s intuitive interface to link services, ensuring they clearly represent the connectivity between pods.
Deploy strategies: Illustrate different deployment strategies like rolling updates or blue-green deployments, making sure to show the flow of traffic and changes over time.
Collaborate and share: Use Miro’s collaboration features to work with your team in real-time or asynchronously. Share your diagram, get feedback, and iterate on the design.
By using Miro's Kubernetes architecture diagram tool, you can transform complex Kubernetes architectures into clear, visual diagrams that everyone on your product team can understand and work with. Whether you’re explaining the architecture to new team members or planning the next big deployment, Miro's visual workspace makes the process seamless and collaborative.
In summary, having a good understanding of Kubernetes architecture is crucial for effectively managing modern containerized applications. By breaking down the components and using tools like Miro, you can generate, visualize, and distribute Kubernetes architecture diagrams that improve your team's productivity and collaboration. Explore Miro's innovative workspace now and witness how it can streamline your journey with Kubernetes.
Author: Miro Team
Last update: October 14, 2025